Contents
User management
MediaStore makes it easy to manage your user database yourself and not only control your colleague’s access, but also retain authority over clients’ accounts:
Inviting members of your team
To send an invitation link to a colleague, please follow these steps:
- Go to Users > Users and click Add New.
- In the entry wizard, fill in at least the mandatory fields (marked *). Be sure to set the Organization to the same as in your own user account. For Role, use the appropriate admin-level role (usually Manager, Admin, Agent or similar).
- Submit in order to finish setting up the user entry. It will now be at the Inactive status.
- On the user entry detail page, click Actions > Invite in the top right corner. This will dispatch an invitation email to the new user’s email address.
- After the new user has opened the confirmation link in their invitation email and set a password, they will be able to log in. Using an admin-level account (Manager, Admin, Agent or similar), you can log into both your admin site and your client site. On the client site, you’ll retain access even to content which has not been published to client users.
In case the new user entry cannot be saved, most likely an entry for the given email address already exists. Perform a search to find the entry – if it exists with Active status, ask the user to use the Recover Password functionality on the public landing page. If its status is different, you can e.g. Reinvite based on the given status.
Inviting clients
You can send an invitation link to a client in order to make it as easy as possible for them to access your client site – they’ll merely need to set a password and log in. Please follow these steps:
- Check if the new client’s organization already exists in the system. To do so, go to Users > Organizations and perform a search by using the search field in the top right corner. In case it doesn’t exist, use Add New to enter key organization data – in the entry wizard, fill in at least the mandatory fields (marked *) and Submit.
- Go to Users > Users and click Add New.
- In the entry wizard, fill in at least the mandatory fields (marked *). Be sure to set the correct Organization. For Role, use Client.
- Submit in order to finish setting up the user entry. It will now be at the Inactive status.
- On the user entry detail page, click Actions > Invite in the top right corner. This will dispatch an invitation email to the new user’s email address.
- After the new user has opened the confirmation link in their invitation email and set a password, they will be able to log in.
In case the new user entry cannot be saved, most likely an entry for the given email address already exists. Perform a search to find the entry – if it exists with Active status, ask the user to use the Recover Password functionality on the public landing page. If its status is different, you can e.g. Approve or Reinvite based on the given status to issue a signup link.
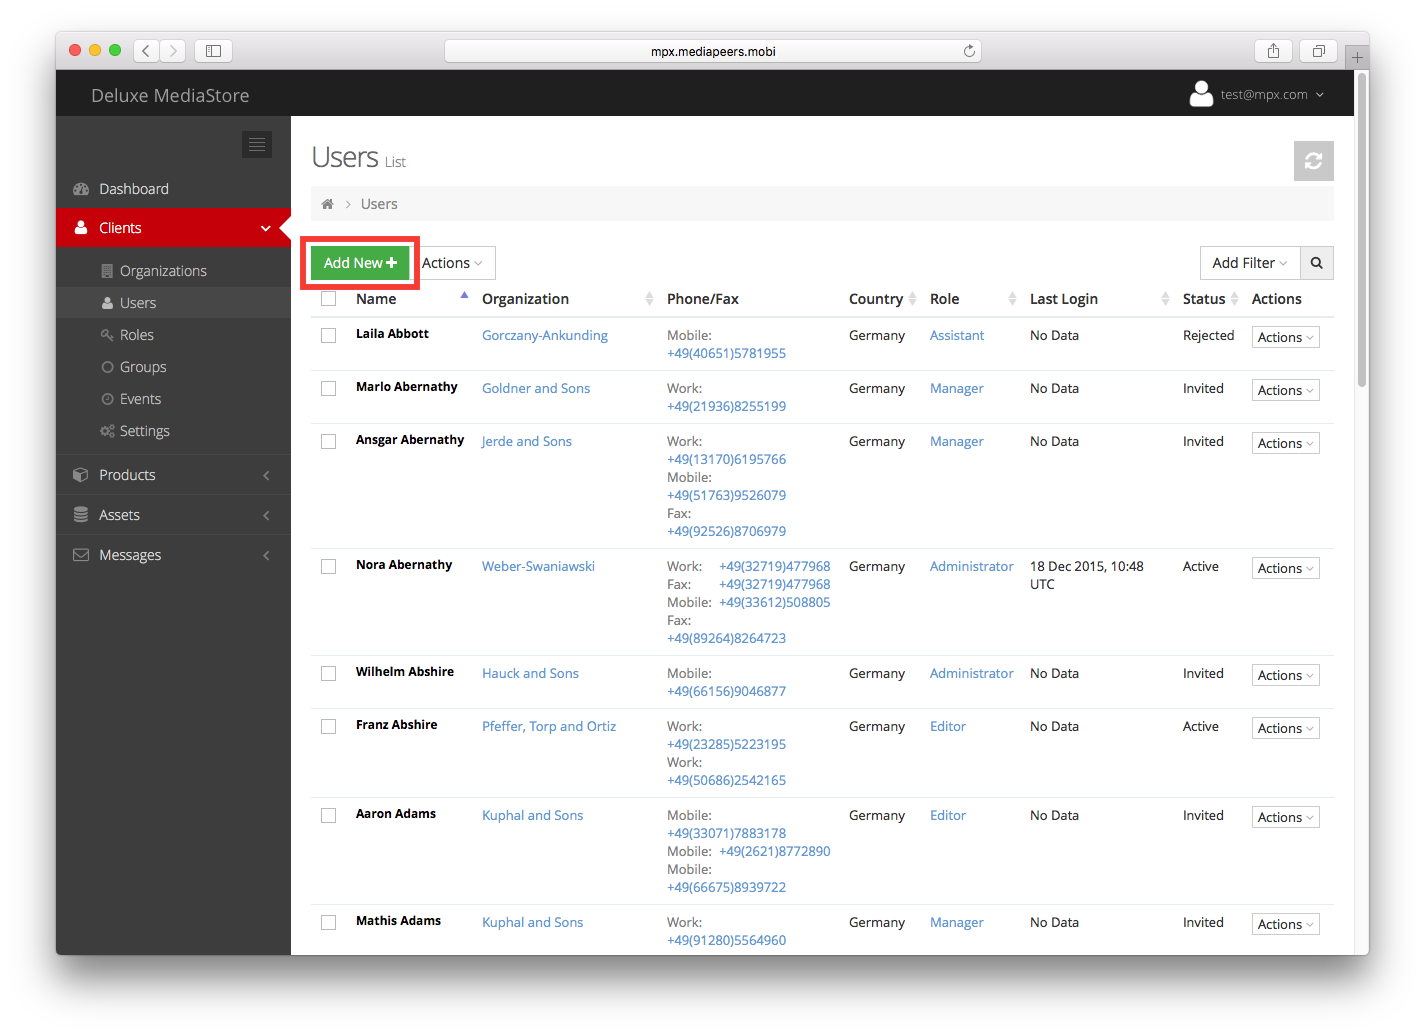
Click Add New to invite new users and clients
Processing client registrations
When clients submit a registration using your public registration form, you retain the choice of whether to grant them access. To review pending registrations, please do the following:
- Go to Dashboard and at the bottom next to Tasks > X users require approval, click Review.
- You will be presented with a list of all Pending users, starting with the most recent registration. Depending on your preference, use one of these available Actions:
- Approve: In the approval dialogue, review the Organization and set Role to Client, then click Update and finally Approve. The new user will receive an invitation email. After they’ve opened the included confirmation link and set their password, they will be able to login.
- Reject: The user will receive an email stating that their registration has been rejected, and the user entry will be deleted.
- Delete: The user entry will be deleted without informing the user.
Note that under Settings > Affiliation > Email Settings > Registration Notification Emails, you can optionally define a (comma-separated) set of email addresses which will receive an email notification each time a new client registration is submitted, allowing you to keep track of incoming registrations without logging into the platform.
More details: User management
Content & asset management
MediaStore’s content management functionality includes everything you need to manage and present your catalog, including program metadata and flexible assignment of any digital assets.
Adding products
A product is a metadata entry which does not have any assigned assets when first created. Assets are uploaded separately and can then be assigned to Products providing images, screeners and downloadable assets. To add products to your catalogue:
- Go to Products.
- Click Add New.
- Start filling in the entry wizard by selecting one of the available Product Types, typically Format, Program, or Series. (For setup of seasons and episodes, see below.)
- Fill in the Product’s key details, providing at least the title and any other mandatory fields marked *. Click Proceed.
- A basic page for your new Product will appear, alongside a dialog where you can select to Autofill your new product from metadata layers from an existing product – if you would not like to do this and start metadata entry from scratch, click Cancel.
- Fill in key data on the new product’s metadata layer. None of the additional metadata fields are mandatory, but besides the Title you might typically want to define at least key details such as Genre, Synopsis, Duration and Year of Production. For additional sections such as Cast, you can use the Add and Remove icons to manage items.
- Click Submit to create the product entry.
Products can have one or several metadata layers allowing you to manage multiple sets of metadata e.g. in different languages or prepacked for different VOD vendors, though MediaStore usually only displays the initial default language layer in the client-facing site.
Adding a season or episode to a Series product
After a product has been created you can set up parent-child hierarchies such as Series-Seasons-Episodes. Note that this may not be necessary in case you would like to reduce the number of titles managed in the system, and your main objective is to provide a single-destination page for each series where your clients may preview its key images and videos without having to navigate further.
If a parent entry (e.g. Series) is already available, you can add Seasons or Episodes as follows:
- Go to Products.
- Click Add New.
- Select product type Season or Episode in the entry wizard.
- Select which Parent entry and Sequence Number (e.g. episode number) the Season or Episode should have, then click Proceed once completed.
- Another entry wizard will appear where you can select to populate your new product from metadata layers from an existing product (in case you’d like to prefill metadata from an existing product, such as the existing Series) or click Cancel (in case you’d like to start metadata entry from scratch). Do not navigate outside this page until you have followed the remaining steps.
- Fill in key data on the new layer, for additional sections you can use the Add and Remove buttons to manage items.
- Click Submit to create the product entry.

To add a new product, series, season or episode click Add New
Uploading assets
MediaStore allows you to upload assets of any kind and assign them to one or multiple products. An asset is composed of a metadata entry (such as Title and Asset Type) and the file itself. Later, access levels, permissions and groups (see below) can be used to manage availability of the Assets to either specific user groups or individual users.
To upload Assets:
- Go to Assets and click Upload New.
- Drag and drop files into the open dialog or select Add Files.
- Fill in Asset metadata; you can either use the Presets box at the top to adjust a value for all Assets, or adjust each Asset’s metadata individually.
- At this stage, you can assign a Product by filling in the Products field and selecting Add. Or, choose to Add incl. descendants which allows you to associate an Asset with e.g. all episodes in a series. This assignment can also be done once the asset is uploaded.
- In case the uploaded assets are to be used as marketing assets (such as key art images or streamable videos – see below), you can directly tick Use as marketing asset. This will flag the assets as marketing assets on the assigned Product(s).
- Click Upload. Depending on the total volume of assets and your connectivity, the upload may take some time. You may simultaneously continue using the platform in another browser tab.
- Once all assets are uploaded, click Close to finish.
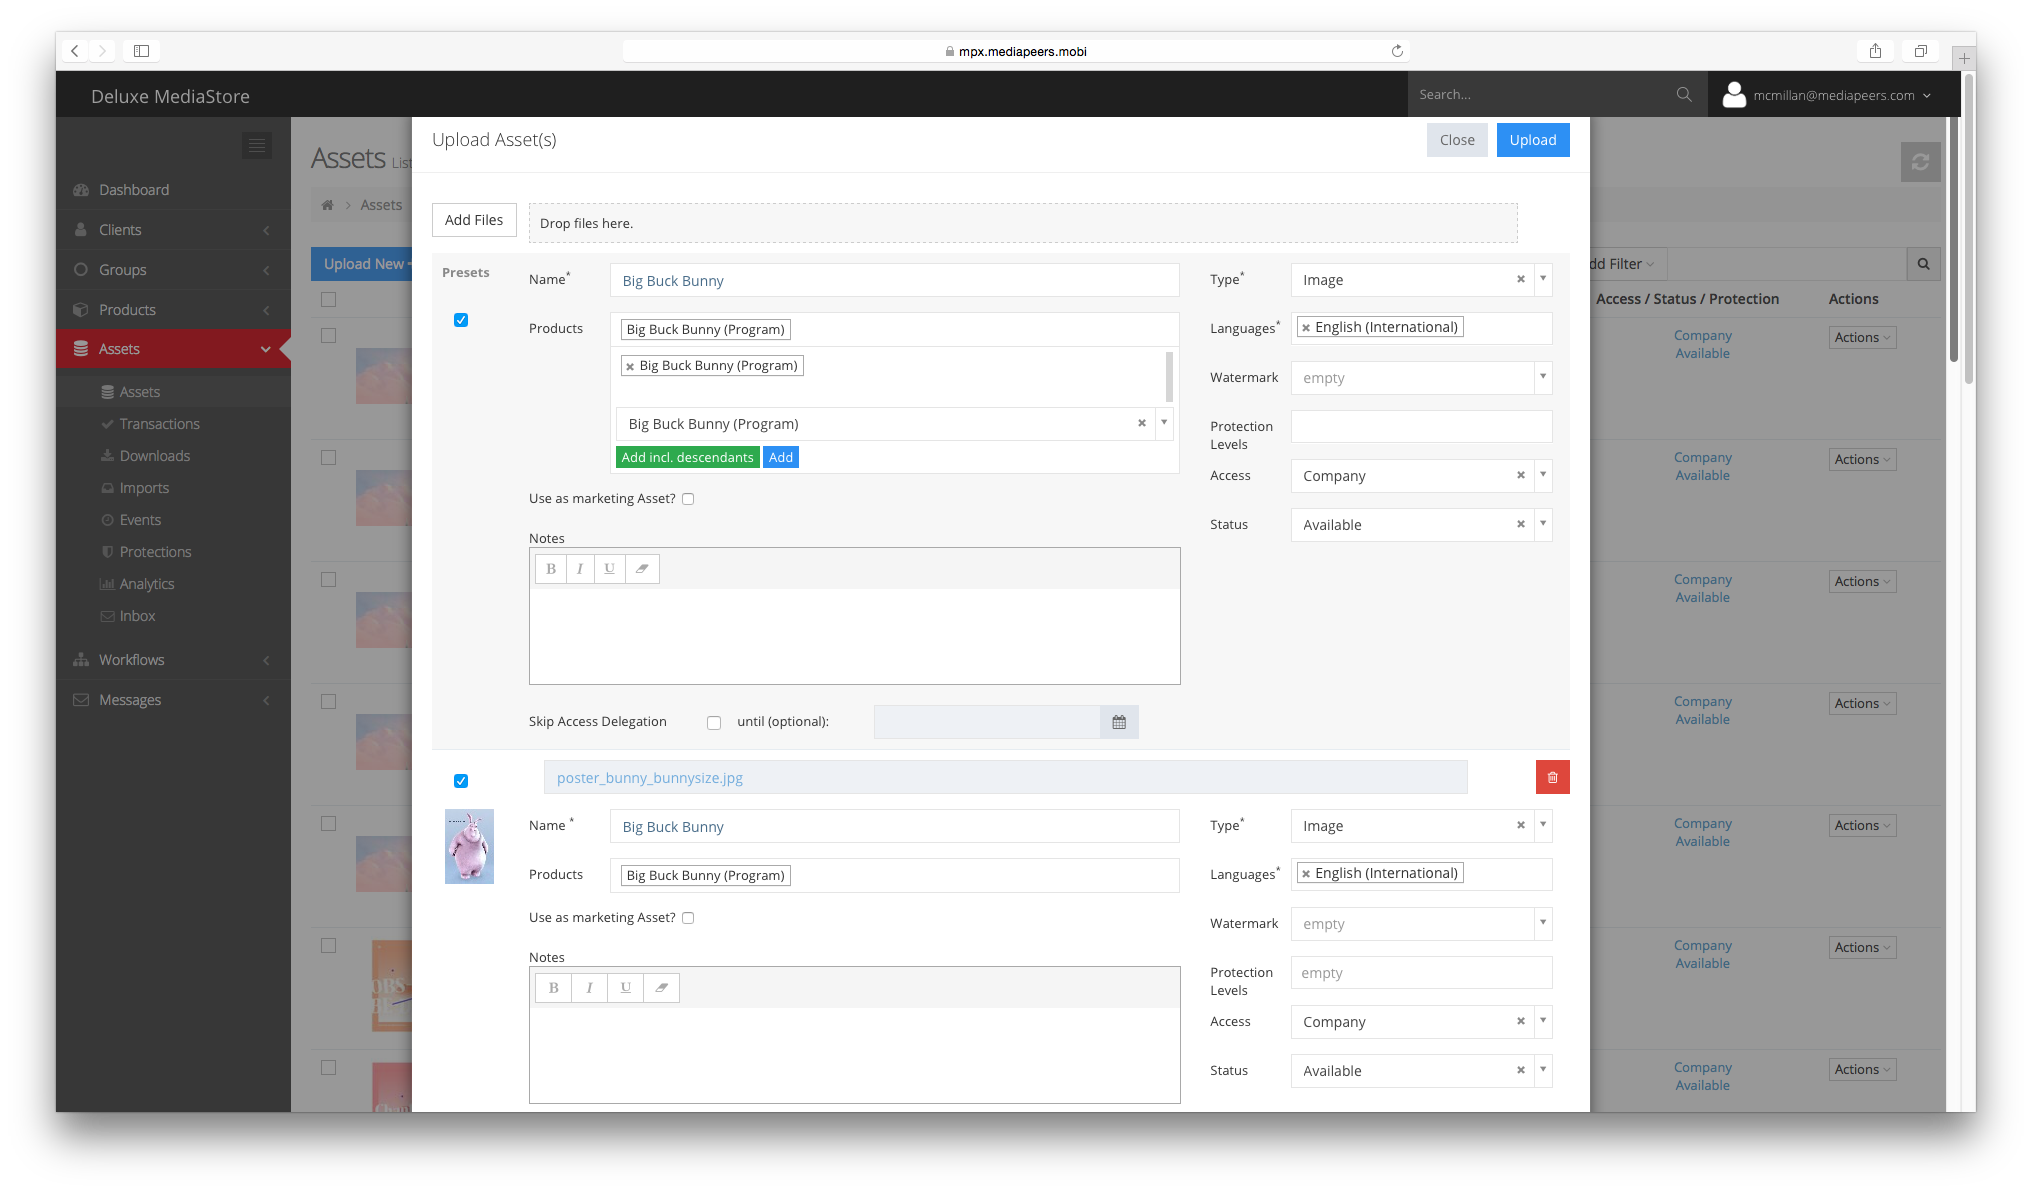
Complete asset metadata and select Upload
Assigning assets to products
Once assets are available on MediaStore, and a product has not already been assigned during upload, there are a few ways you can assign assets to products:
- Go to the Asset list and select Actions > Assign to Product for individual assets.
- To bulk assign assets to products, tick the assets and select Actions (in the top navigation) > Assign to Product.
- Open the asset, navigate to the Products tab and select Assign.
A dialog will appear where you will be able to select the product you wish to assign the asset to. Once complete click Assign and Close or Assign and Continue to assign the asset to another product.
Assets are fundamentally independent of product and may be assigned to multiple products or even none at all.
Flagging assets for marketing use
MediaStore uses “starred” assets to represent its assigned Product on the client site. This means that the asset will be used for purely presentational purposes (e.g. a key art image or a streamable trailer). During upload, or when assigning products to an asset, you can do this by ticking the Use as marketing asset box. Alternatively, even after it has been assigned to a product, you can flag an asset (usually a Trailer, Screener or Image) as a marketing asset simply by highlighting the yellow star next to the asset.
Note that it is only if a video is flagged as a marketing asset that it will become streamable on the given product page in the client site.
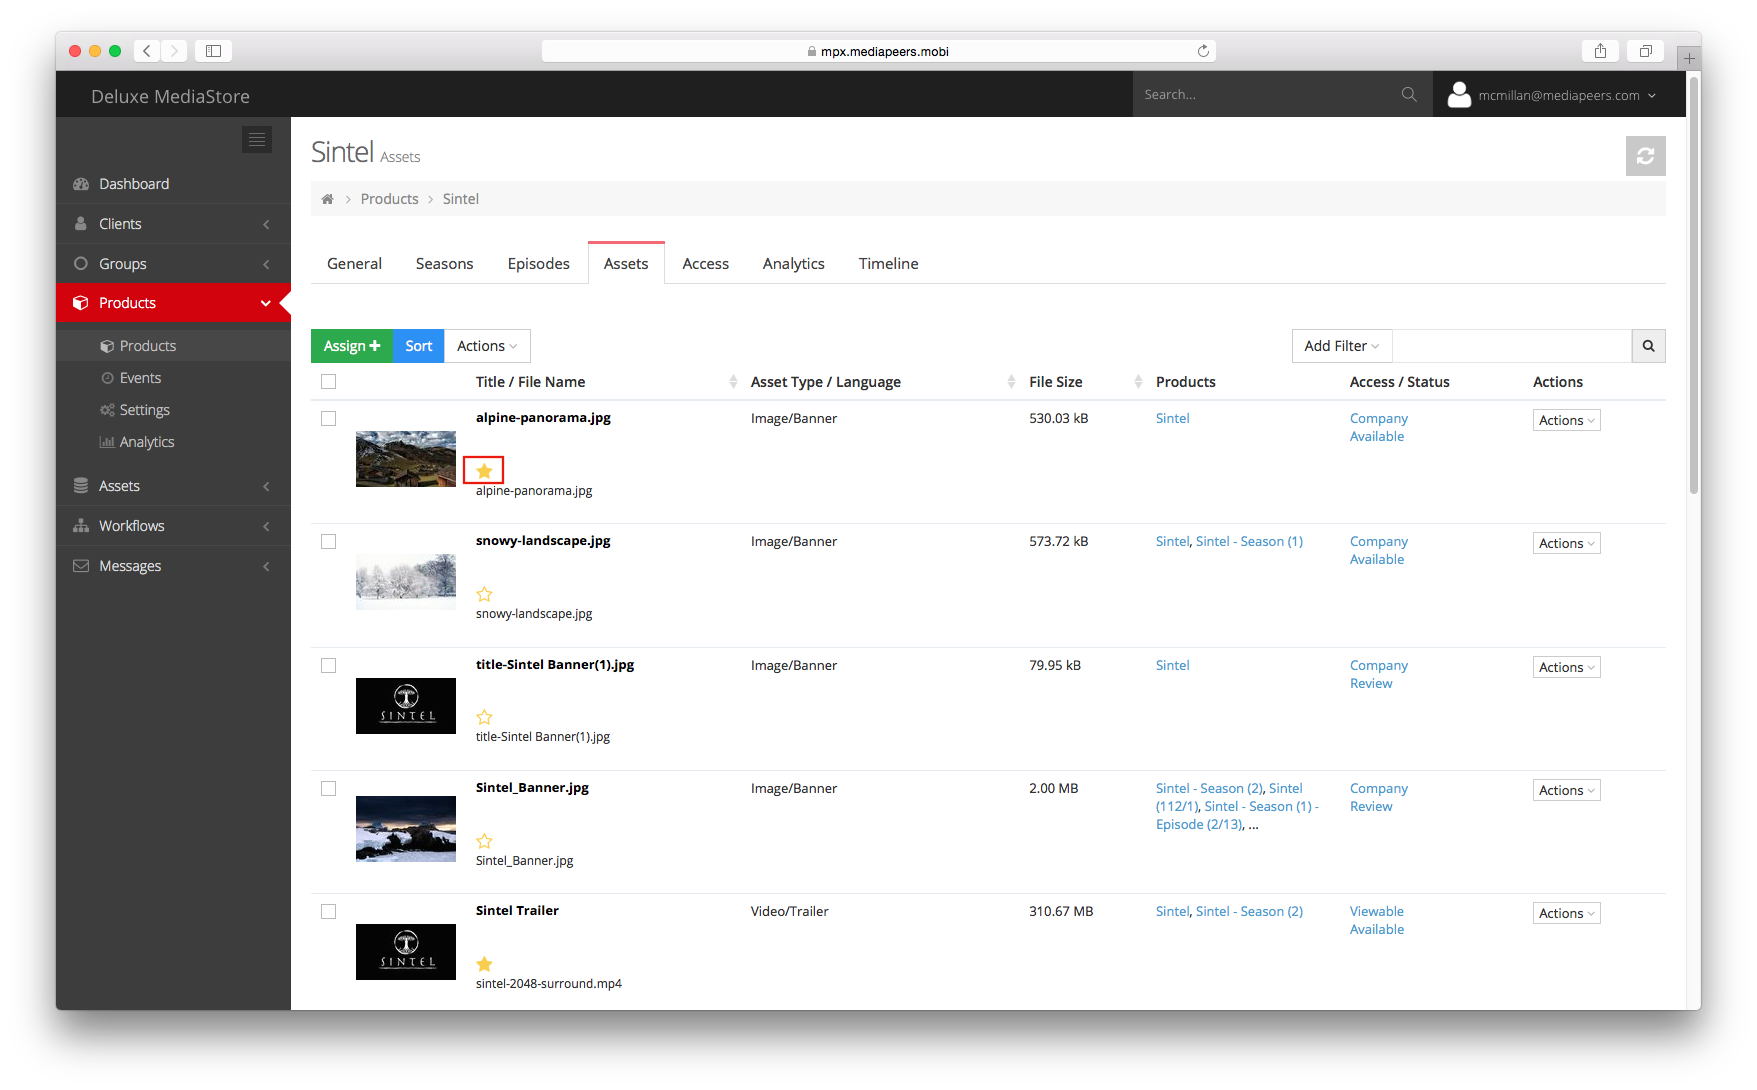
Flag an asset to use for marketing by highlighting the yellow star
Access settings
The Access level of a product or asset impacts its availability to users. Access levels can be modified at any time via available editing functions.
- Private: available only to you personally (and to high-level admin users).
- Company: available only to Users in the organization; not available to client Users.
- Viewable: available to admin Users; visible to logged-in client Users.
- Public: visible to admin Users, logged-in client Users and public visitors (only applicable if your platform comprises a public catalog).
In addition, on assets you will find the Download tickbox under Permissions which, if ticked, lets client users download the asset in case they are able to view it.
Status
The Status field optionally allows you to record asset status related to internal workflows. An asset must have a status of Available (which is the default status) before Access levels (see above) can be used to make it visible or downloadable to clients.
The following Status may be applied to an Asset:
- Created: The Asset was created and is now present in the system. Regardless of Access level, a Created Asset is not available to client Users.
- Review: The Asset is earmarked for Review. Regardless of Access level, a Review Asset is not available to client Users.
- Available: The Asset is available without any reservations. Once an Asset is Available, Access levels can be used to impact its availability to client Users.
- Archived: The Asset should not be used productively anymore. Regardless of Access level, an Archived Asset is not available to client Users.
Setting Access on Products and Assets
Using Access levels, permissions and Asset Status you can control the availability of Assets and Products. There are a few ways to update the Status and Access:
- Click an Asset/Product current Access level and Status in the Access / Status column.
- Tick any Asset/Product you’d like to modify, then choose Actions > Change Access or Change Status in the top navigation.
- Open an Asset/Product detail view and modify the Access or Status value in the General tab.
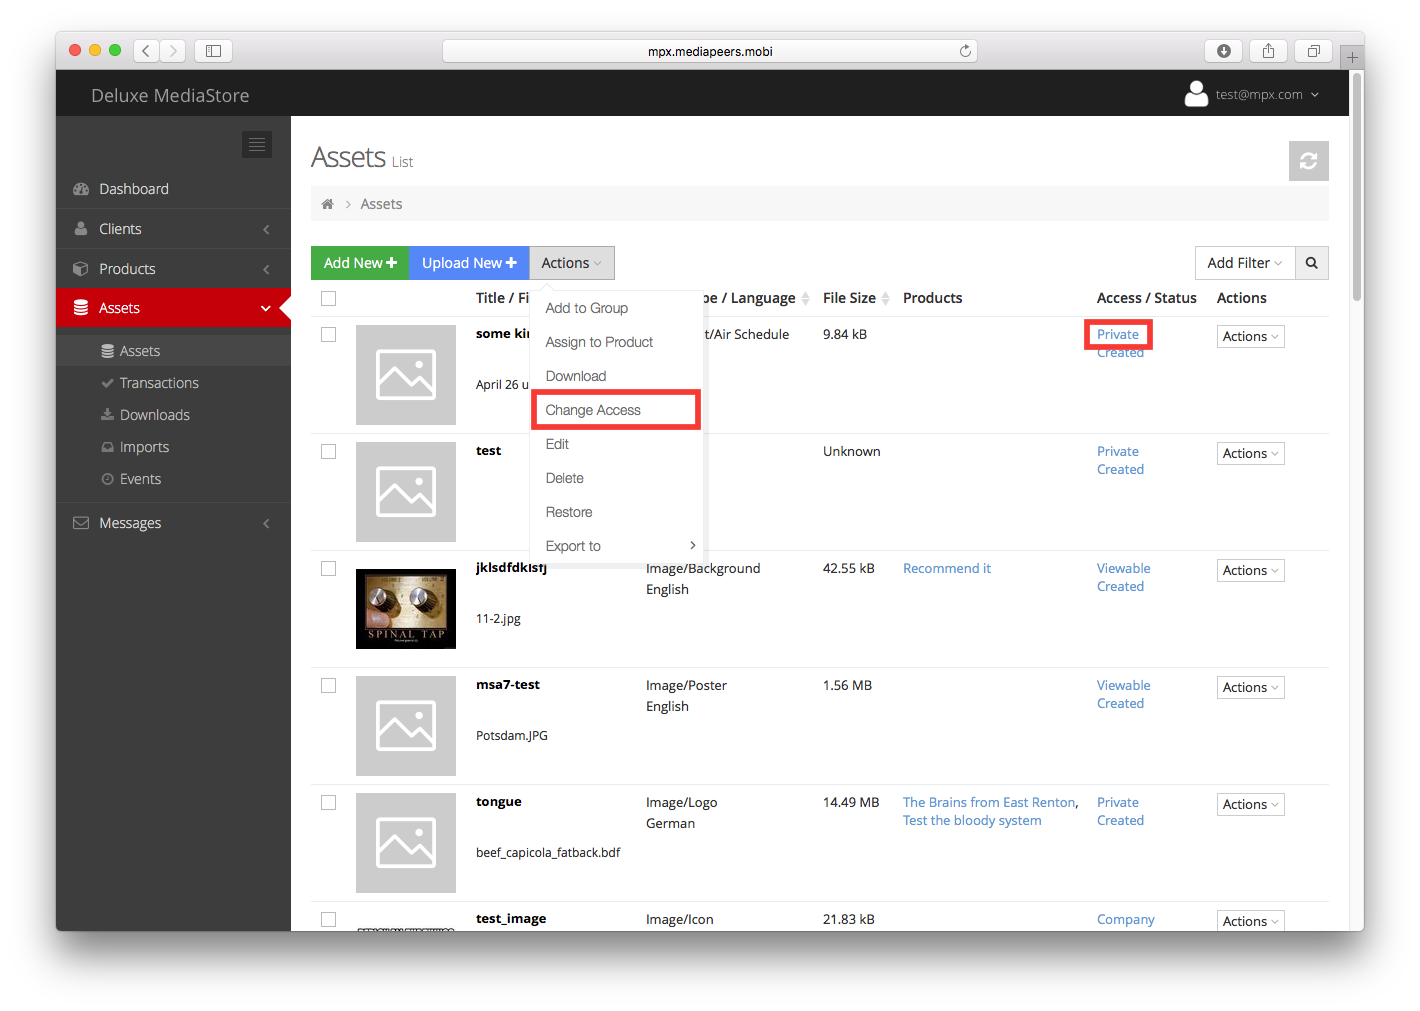
Updating access for Assets and Products
More details: Product management, asset management
Sales & marketing
A pivotal portion of MediaStore’s functionality relates to presenting content and video to clients. The following core features are especially useful:
Sending screening links to clients via email
In order to send a screening link to any client (whether registered or not), MediaStore’s Recommendations are an easy-to-use tool giving you detailed controls for on-point sharing of videos. To recommend one or more titles, please follow these steps:
- Go to Products in the main navigation and search for a (first) title to recommend.
- Use Actions > Recommend to open the Recommendation dialog.
- In case you would like to add further titles, click the Product(s) field at the top of the form, where you can search for additional titles in order to add them.
- Enter the recipient(s), a personal message and (optionally) a custom message subject.
- Define the message’s validity settings, such as expiry date, login/registration requirement and (optionally) number of views.
- Under Videos, tick the video(s) which should be included.
- The recipient will receive an email including a preview link to a page showing the recommended title’s metadata and selected video(s) using the selected validity settings.
Note that clicking Send emails will send the recommendation message directly to the recipient(s) you have defined, whereas Generate links only will send the recommendation link(s) only to you personally, so that you may copy-paste and forward them to the specified recipient(s) yourself.
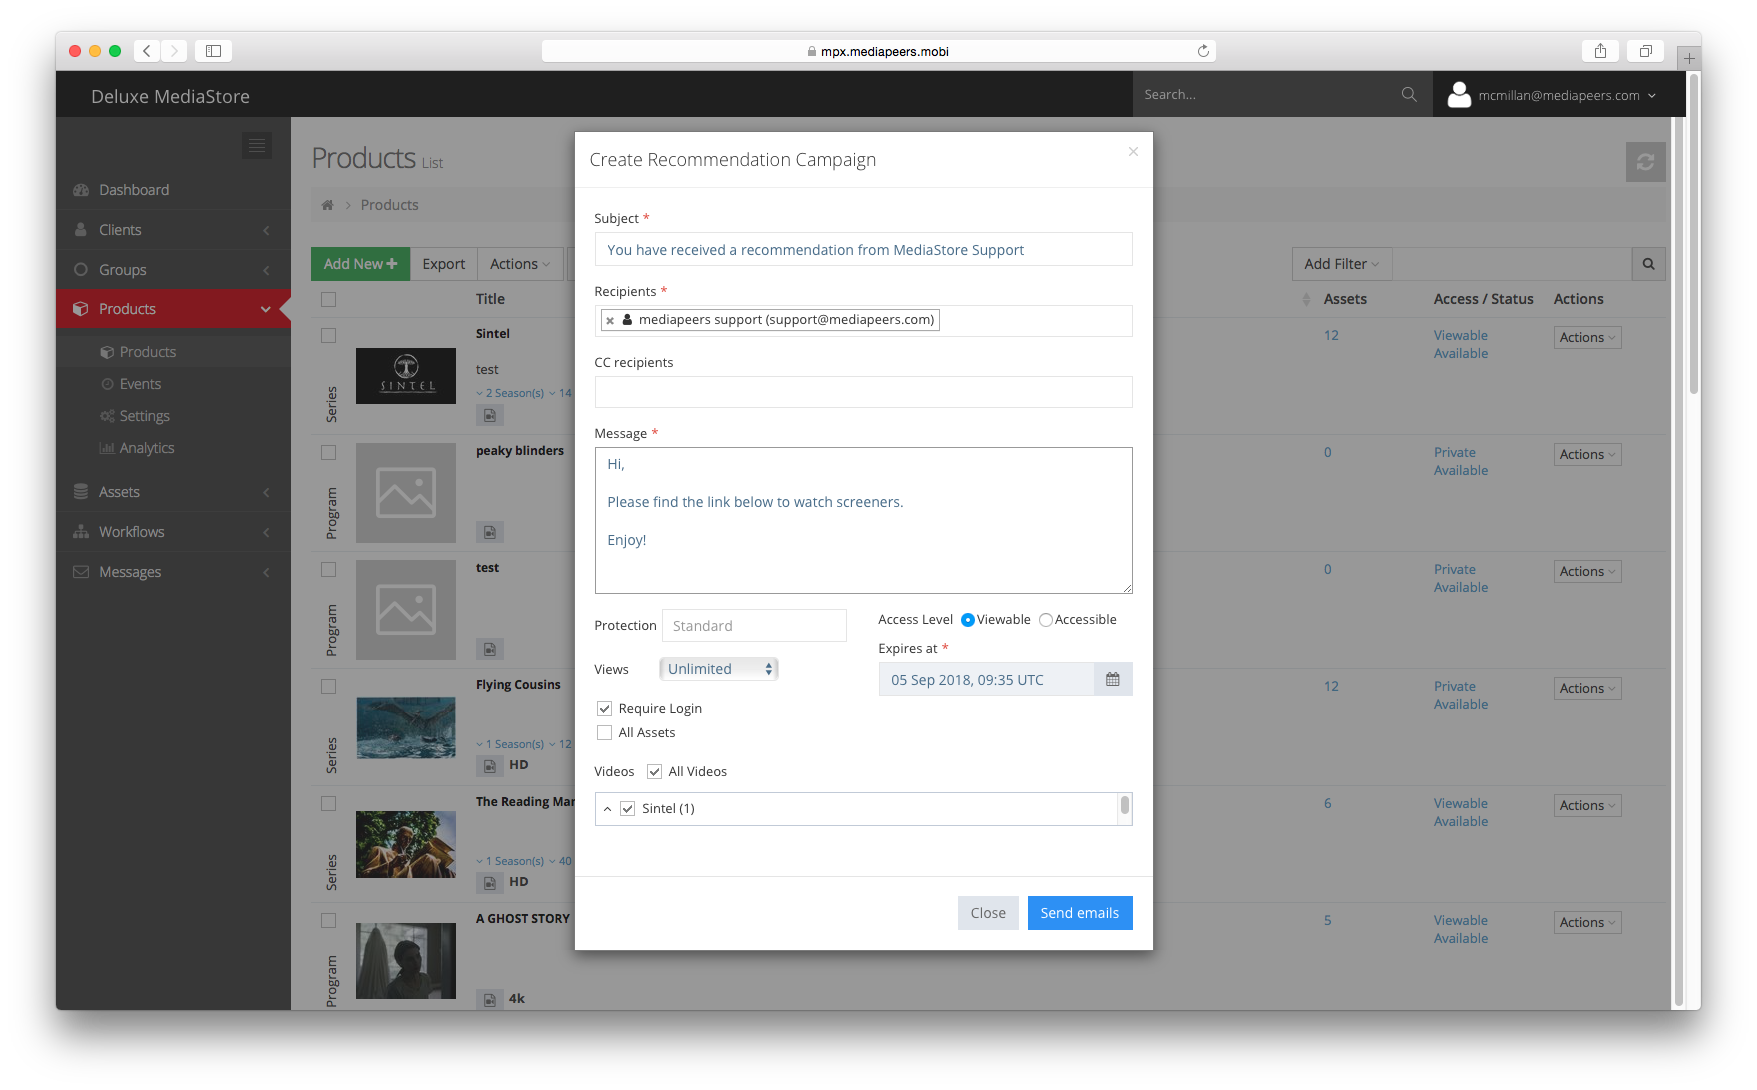
Recommendation dialog for single and multiple titles
Further note that two sales tools similar to Recommendations are available: Selections and Screening Rooms. Screening Rooms are primarily geared towards presenting larger packages of titles which may evolve over the time of e.g. an offer process; meanwhile, Screening Rooms cut straight to specific videos without presenting any extraneous metadata from their related titles. In case you are interested, please read more about these tools here.
Reviewing client usage analytics
As clients make use of the MediaStore platform, various analytical data is recorded which can be reviewed in detail – product page views, video screening, asset downloads and recommendation views. The following is an overview of the key functionality:
- Product analytics (page views): Go to Products > Analytics. By default, the past two weeks are being analyzed; use the date picker in the top right corner to modify this. The Overview tab features a bar chart of overall product views per day, plus tiles of the top products; additionally, tiles at the top show view trends by product type against the previous period of the same length. The Details tab lists the most viewed products in more detail, including number of views and top user.
- Screening analytics (video views): Go to Assets > Analytics > Screening. By default, the past two weeks are being analyzed; use the date picker in the top right corner to modify this. The Screening tab features a bar chart of overall video views per day, plus tiles of the top videos; additionally, tiles at the top show view trends by video type against the previous period of the same length. The Screening Details tab lists the most viewed videos in more detail, including number of views, total view duration and top user.
- Asset analytics (downloads): Go to Assets > Analytics. By default, the past two weeks are being analyzed; use the date picker in the top right corner to modify this. The Overview tab features a bar chart of overall downloads per day, plus tiles of the top assets; additionally, tiles at the top show view trends by asset type against the previous period of the same length. The Details tab lists the most downloaded assets in more detail, including number of download and top user.
- Product recommendation analytics: Go to Products > Analytics > Recommendations. By default, the past two weeks are being analyzed; use the date picker in the top right corner to modify this. The Top tab features a bar chart of overall recommendations sent per day, plus tiles of the top recommended products. The Details tab lists the most recommended products in more detail, including number of views and top recipient.
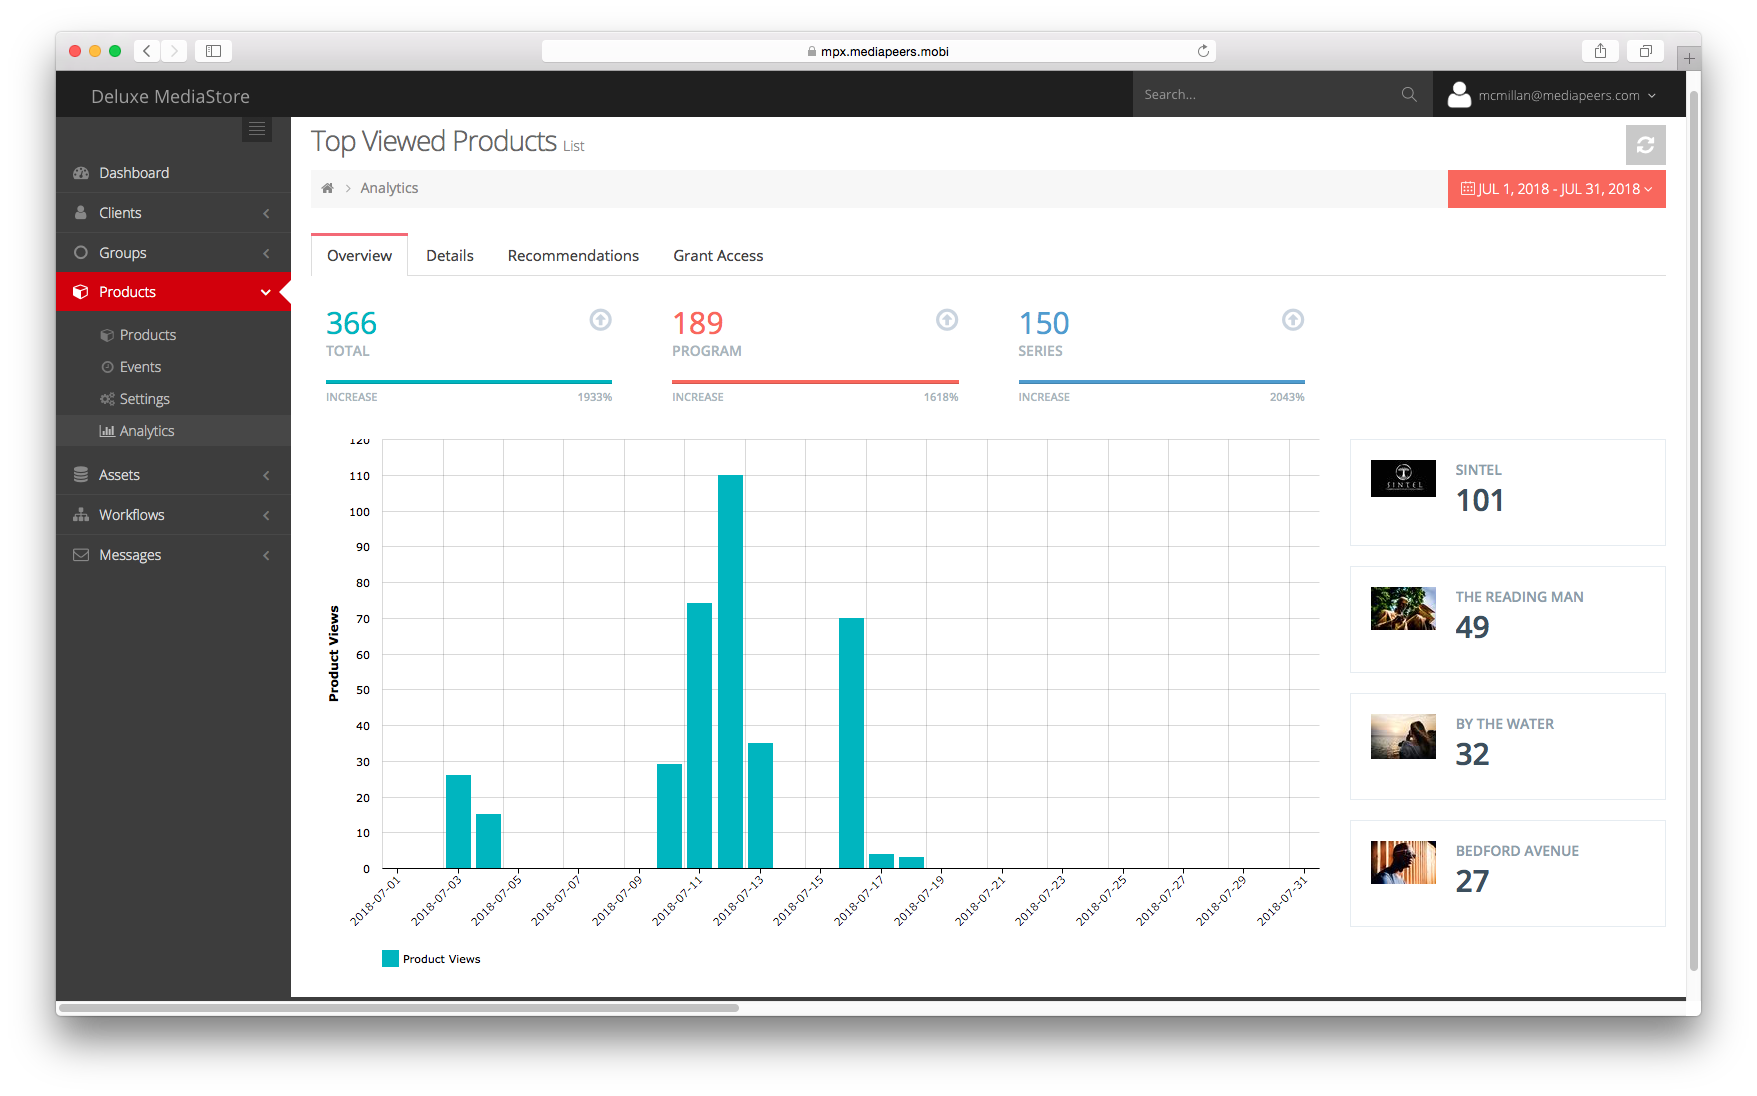
Detailed Analytics page
No matter which part of the Analytics you’re viewing, clicking one of the available links (e.g. user name, product title) will lead you the Analytics page for that particular item only, so you can review e.g. a specific user’s behavior or track views of a specific video.
Furthermore, in all main Details lists, you’ll find an Export button which will provide a spreadsheet export of all individual usage traces of the given type and for the given period – allowing you to deep-dive to the most granular level and compile your own aggregations.
Populating slideshows, contact pages and other dynamic elements
MediaStore offers various easy-to-use content management features to help populate frequently changing elements of your client site, such as slideshows, dropdowns and contact lists.
For this purpose, you will find the following so-called Special Purpose Groups under Groups > Special Purpose:
- Slideshows: groups titled according to your client site (e.g. Hero Slider, Drama Slider or similar) allow you to populate client-facing slideshows. To do so, open the group in question, move to its Products tab and use the Add or Remove buttons to change the line-up. You may also use Sort to influence the order.
- Sales Contacts dropdown in the registration form: In case your client site allows new users to select a sales contact, you may manage this list by opening a group titled Sales Contacts or similar. In its Users tab, use the Add or Remove buttons to change the displayed sales contacts. You may also use Sort to influence the order.
- Content of the client-facing contact page: In case your client site features a non-static contact page, you will find at least one group titled Contacts or similar, possibly multiple ones separated by e.g. business areas or territories. In its Users tab, use the Add or Remove buttons to change the displayed contacts. You may also use Sort to influence the order. Any additional data per contact displayed on the contact page (e.g. email, phone number, address) is drawn from the user profile’s details.
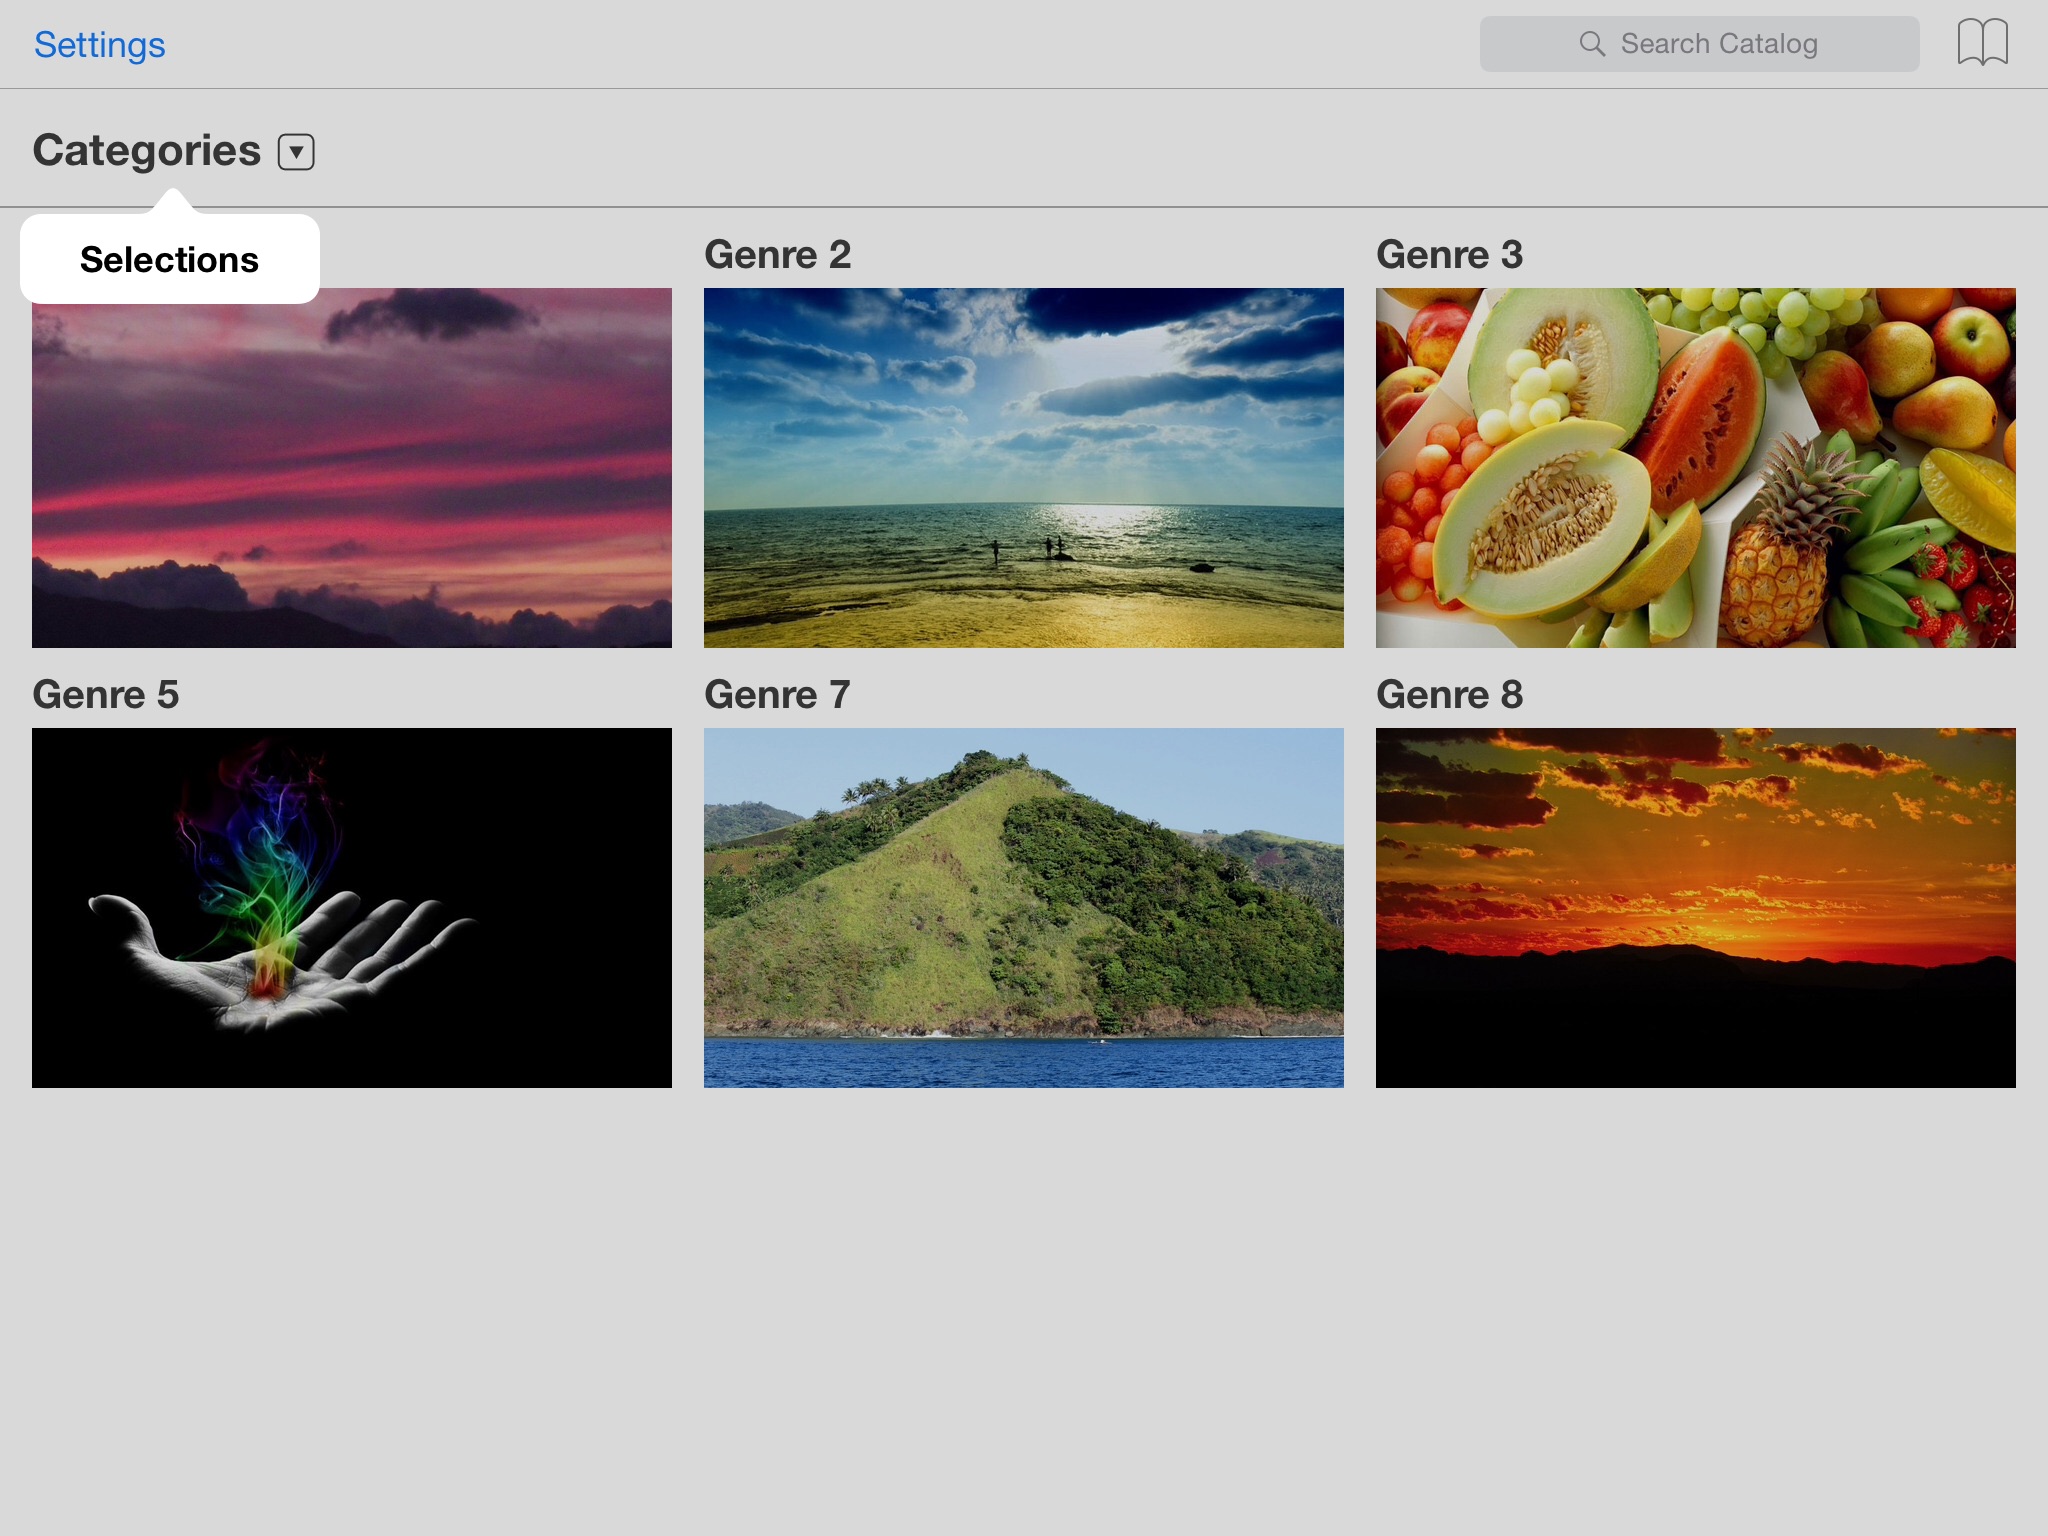
- Genre slideshow key images: If your client site includes a slideshow of available genres e.g. on the landing page, you may update the genre key images (to override the automatically picked preview images). Go to Settings > Genres and click Actions > Upload Preview Image to upload a custom genre key image.
Depending on your client site implementation, there could be additional groups in the Special Purpose Groups section. The title and contents should give sufficient indication of what their purpose is, otherwise please contact us.
Additional sales tools
These optional tools are available at an extra charge and thus may not be included in your MediaStore package. If in doubt, please ask your MediaStore coordinator or contact us directly.
- Screening conferences: Our integrated conferencing solution is purely browser-based, requiring no software installation, and offers all the features you would expect of a state-of-the-art conference tool, such as flexible webcam and audio interfacing, multiple conference modes, waiting rooms, and raise hand functionality. What sets it apart is the possibility of leveraging MediaStore’s streaming architecture to directly deliver an optimal multi-bitrate video stream to each conference participant for top-quality screening calls and events. See here for more details.
- iPad catalog application: This app provides offline screening of individually selected titles and videos, making it a perfect tool to take into markets, pitches and meetings. Apart from offering a fully browsable catalog saved in your iPad’s storage, it can also display video in fullscreen and to second screens. For our full iPad app user guide, please see here.
- Campaign tool: MediaStore is partnering with Campaign Monitor to provide a state-of-the-art email campaign tool, offering an easy-to-use email template builder or import of custom HTML files. It synchronises contact lists stored in MediaStore, making it easy to use MediaStore’s capabilities as a repository for client contact data to compile addressee lists and use the campaign tool to dispatch campaigns to these. For our full campaign tool user guide, please see here.
The iPad Catalog application permits offline screening optimized for meetings and markets
More details: Product recommendations, Selections and Screening Rooms, special purpose groups, genres, additional marketing and metrics
Post-sales & delivery
When it gets to delivering assets to clients, MediaStore operates on permissions-based access tools to ensure that your clients will be able to retrieve the required assets:
Defining asset access via groups
Assuming that you’d like to keep download access to your assets restricted to those who have actually acquired the requisite license from you, MediaStore’s groups offer a versatile way of selectively giving client users access to specific sets of assets only. Use the following steps to define group-based access:
- Go to Groups > General and click Add New to set up a group, then enter a title and confirm.
- Go to the group’s Products tab and click Add. (Alternatively, you can use Actions > Add to Group from the Products section.)
- In the ensuing dialog, add the product(s) the assets are assigned to. Add incl. descendants will add all hierarchically subordinate products too, e.g. any episodes if a season is selected. (When adding products from the Products list, conversely, select the group to add the selected product(s) to.)
- In the Group Access field, enable Viewable access.
- Tick the box Apply access level to assigned assets in order to apply the access to all assets which are assigned to the product(s).
- In addition, tick the Download permission to provide download access to all assets assigned to the product(s).
- Repeat steps 2-6 for any additional products whose assets should be made available for download as part of this package.
- Move to the group’s Users tab and click Add to add the client users who should receive the access you have just defined. (Alternatively, do the same in the Organizations tab to add entire organizations including all their users.)
- As a result, any Users/Organizations you’ve added to the group will have download access to all assets assigned to the products you’ve added.

Adding Products and applying Group access
Using Grant Access to provide asset access notifications
Similar to the sales-oriented product recommendations, Grant Access can be used to define time-limited download access to all assets assigned to a product. In the Products list, use Actions > Grant Access on any products, then define the recipient(s) and validity period. The recipient(s) will receive a link leading them to the detail pages for the included product(s), granting them download access to the assigned assets.
More details: Groups, Grant Access