Screening conferences are available as an added subscription service on top of your MediaStore platform. If you are interested, please contact us.
Screening conferences: introduction
Video conferencing isn’t a new or exclusive technology, but it usually makes it cumbersome to present videos directly to call participants. Of course, if you are using screen-sharing, you can broadcast your desktop screen and play a video on it locally, but framerate and overall quality will be greatly reduced for call participants; similarly, sending a screening or download link to individual viewers is possible but requires additional logistics and relies on the recipient to proactively open or download the video.
With MediaStore’s screening conferences, you can host conferences including all relevant features – voice, camera, screen-sharing, text chat – but, in addition, also stream videos directly to call participants. You can simply draw from all videos which are already hosted in your MediaStore platform. As a moderator, just line up your videos and present them within your conference. As soon as you play a video, each call participant will receive a direct stream at optimum multi-bitrate quality, just as if they were streaming directly from your client-facing MediaStore site. Each participant’s connection speed will be accounted for automatically so that you needn’t worry about connection issues or asynchronicities. As the moderator, you retain control of which video is shown and can move the playback position, or even switch to other assets such as still images – participants will be able to watch everything directly, but cannot control media playback themselves.
Available conference types
When setting up a conference as per the guide below, your screening conference will be set to the default Conference type automatically. However, if you wish to make use of the other available Conference types, you can select them either when setting up your conference or later on. All in all, you may pick from among three distinct options:
- Conference: The default conference type. This is set automatically unless you specifically change the Conference type.
- The moderator manages the conference and can approve participants as they request to join via the conference URL.
- Participants can optionally be pre-approved by adding their user accounts to the Screening Room Group beforehand.
- The moderator and each participant will be visible to all others if their webcam is enabled.
- Panel: A conference type for structured meetings or larger rounds with a selected group of active hosts and a number of largely passive participants.
- The moderator and all co-panelists must be added as users to the Screening Room Group beforehand.
- The moderator manages the conference and can approve participants as they request to join via the conference URL. Co-panelists are pre-approved.
- Only the moderator and predefined co-panelists can show their webcam view.
- Regular participants can only speak via audio and use the text chat function.
- If a participant wishes to be highlighted, the participant can use the Raise Hand action (see below); if the moderator then clicks that participant’s Crown icon, that participant’s webcam is enabled and the participant is shown in the central area.
- Webinar: A conference type for larger rounds or events where everyone apart from the moderator is a passive participant.
- The moderator manages the conference and can approve participants as they request to join via the conference URL.
- Only the moderator’s webcam and audio are active. All other participants are passive except for the text chat function.
- If a participant wishes to become active, the participant can use the Raise Hand action (see below); if the moderator then clicks that participant’s Crown icon, that participant’s webcam and audio are enabled and the participant is shown in the central area.
In each conference type, the direct sharing and presentation of assets such as videos and images is possible for the moderator.
Setting up a screening conference
In order to conduct a screening conference, you must set up a Screening Room Group comprising the assets you would like to present, plus optionally predefine participants, and then enable it for conferencing:
- In MediaStore’s administrative site, go to Groups > Screening Rooms.
- Click Add New to set up a new Screening Room Group.
- In your Screening Room Group, open its Assets tab and add any and all assets (videos, images, documents) you would like to present. Alternatively, you may open the platform’s main Assets section and find and add assets to the Screening Room Group from there.
- Optionally, open the Group’s Users tab and add users to the group. This is an entirely optional step to pre-approve participants/co-hosts; a standard conference can be run even without any predefined users in the Screening Room Group (see below).
- In case you are pre-adding participants/co-hosts, note that you may use the Sort dialog in the Screening Room Group’s Users tab to define the order in which they will appear in the right-hand video tile panel. Regardless, the moderator will always be shown first and participants who were not pre-approved will be listed last.
- When using Panel mode (see above), the moderator will only be visible via webcam in case they were specifically added to the Screening Room Group beforehand. This way, in case the moderator only serves as administrative support for another primary speaker (or set thereof), only the speaker can be added to the Screening Room Group in order to make the moderator invisible.
- Back in the group’s General tab, choose Actions > Screening conference. In the dialog, you may define the following optional elements:
- The conference title
- The Conference type (set to Conference by default)
- The start and end time (which can be left blank)
- Select Disable Waiting Room to allow all participants to join the conference without the moderator’s approval (but only after the moderator has started the conference)
- Additional text elements, only in case you would like to deviate from their displayed defaults, such as the Welcome text and Farewell text. These text elements are displayed on the conferencing pages depending on the context the user views them in.
- Save the conference setup dialog in order to be presented with the Conference URL. This is the link which both you as the moderator and all participants will need to use in order to join the conference. A copy-paste icon is available for easy dissemination of this link. Since this is the general conference URL for both the moderator and all other participants, you can share this link when preparing any conference invites you may want send via email or your preferred calendar application.
- Optionally, click Open Conference in order to immediately open the client site with your admin account in order to start the conference.
You may, at any time, reopen the Screening conference dialog later in order to review its details including the moderator, the Conference type and the Conference URL. Also note that a previously terminated conference (see below) can be reopened here using the Reset button.
It is not necessary to add users to your Screening Room Group in order to start and host the conference – this step only serves to pre-approve the selected users for participation, or in the case of a Panel-type conference, to define co-panelists. Even if you skip this step, anyone with the conference link (whether they’re a user of your MediaStore platform or not) will be able to request participation ad-hoc via the link in order to join the conference. Please also note that users who have been explicitly added to the Screening Room Group could be given access to the presented videos on their own time outside the conference itself (see last section below).
Even though the Screening conference dialog allows you to set optional start and end times, the conference link will be valid immediately and until the conference is actively terminated by the moderator. The start and end times, if defined, will be listed on the conference entry page, though.
A screening conference can only be hosted by the user who set up the conference in the Screening Room Group (i.e. who las clicked the Save button in the Screening conference dialog); this user is also shown in the Screening conference dialog. However, in case you would like to reuse an existing Screening Room Group set up by another user without affecting it, you can create your own duplicate by using the Actions on that Screening Room Group. Just bear in mind that you will still need to go through the Screening conference setup step (see above) and that your copy of the conference will then have its own unique Conference URL.
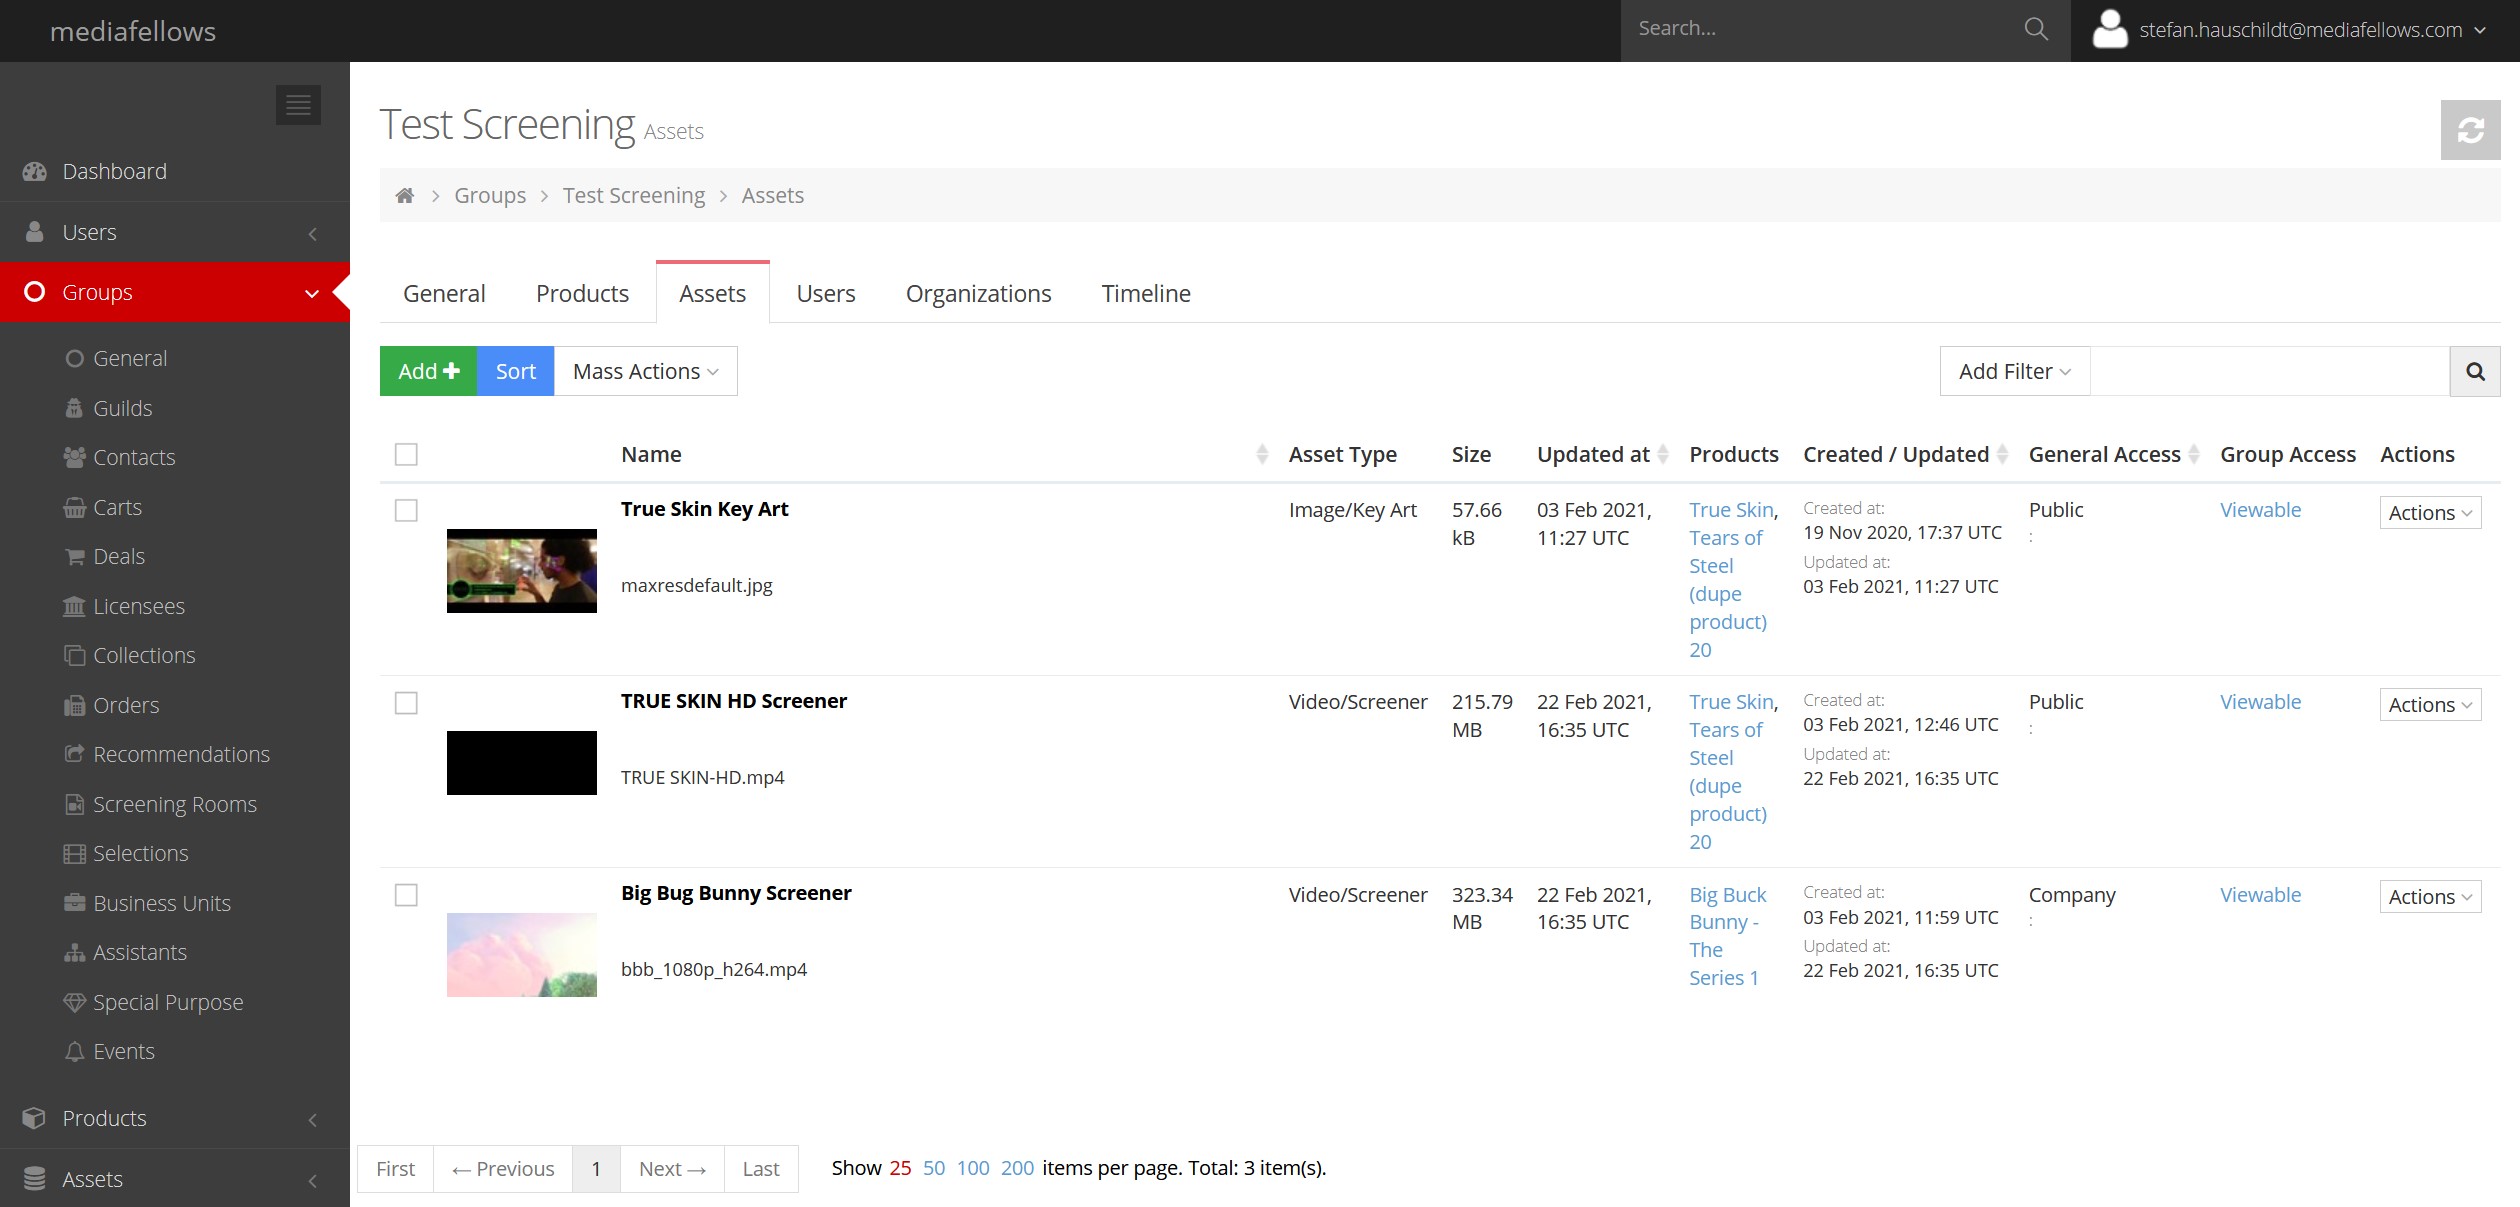
Set up a Screening Room Group and add assets to it in order to create a screening conference

The Screening Conference dialog lets you enable the conference and provides the unique conference link
Hosting a screening conference: starting the conference
The conference takes place in your client-facing MediaStore platform. In order to start your screening conference, follow these steps:
- Log into your client-facing platform with the same user that you used to set up the conference (as outlined above).
- Open the unique conference URL provided during the conference setup phase.
- Entry page: click the button to start the conference.
Participants will see a waiting screen in case the moderator has not started the conference yet; if the conference is underway, they will able to request participation, which makes an approval request appear in the moderator’s view. In case a participant was added to the Screening Room Group as a user beforehand, the approval step will be skipped and they will be able to join immediately. - Device settings: Here you will be able to select and confirm your audio and video settings. A microphone gauge and camera preview are shown. Bear in mind that your browser may request to use your audio and video devices, in which case please approve this.
- Once your device settings are confirmed, the screening conference view will open and participants will be able to join.
Do not forget to log into the client site with your internal user account before opening the meeting link. Otherwise the system will not recognize you and you will not be able to host your screening conference.
In case you or a participant has to reload the page or otherwise rejoin the conference (in the same browser), device settings and approvals are remembered and it will be possible to rejoin immediately.
Hosting a screening conference: in-conference controls
The screening conference view itself provides various controls, many of which are available only for the moderator:
- On the left: settings pane, offering the following controls:
- Participant list including mass mute functionality (the latter only for the moderator).
- Only for the moderator: Participant approval: New participants (who were not pre-approved as described above) will appear via an approval dialog. Select the tickbox icon next to a pending approval in order to let the participant join (or deny them from joining). You can also mass-aprove multiple participants while the participant list is expanded.
- Only for the moderator: Muting participants using the expanded participant list:
- You can mass-mute all participants while the participant list is expanded, by clicking the speaker icon at the top.
- Individual participants may be muted by clicking the “…” icon next to a participant and then clicking Mute.
- Participants only: Raise Hand icon: When a participant clicks this, the moderator will be notified via a “hand” icon (and a separate list of Raised Hands in the expanded participant list) that the given participant would like to speak. As a consequence, the moderator may simply give the participant an opportunity to speak, or especially in the case of a Panel or Webinar, also give the participant the Crown (see below) in order to make them appear as the primary speaker.
- Microphone, audio, and camera on/off button as well as device settings.
- Screen-sharing functionality (only for the moderator).
- Message to waiting room functionality (only for the moderator): Use this dialog to send a text notification to the waiting room and any participants awaiting approval (e.g. in case of delays or technical difficulties on the moderator’s end).
- Hang-up button.
- Only for the moderator: Conference termination options: If the moderator selects End meeting for all, the conference will immediately be terminated, and the conference link cannot be used again later unless the Reset button is clicked in the admin site’s Screening conference dialog. Using Leave meeting leaves the conference open for future usage.
- Text chat between participants.
- Participant list including mass mute functionality (the latter only for the moderator).
- On the right: video tiles of participants (while an asset is being shown or a single user is selected as the main speaker via the Crown icon), with each tile offering the following:
- Microphone icon for muting oneself.
- Only for the moderator: Muting of participants.
- Only for the moderator: Crown icon for (temporarily) highlighting either the moderator’s own webcam view or passing the presenter role to another participant. The selected participant will appear in the central video area until either the “x” icon in the top-right corner of their webcam view is clicked or the Crown is passed to another participant.
- Microphone icon for muting oneself.
- In the center: main video and preview area:
- Upon conference start, the moderator’s webcam video (if activated) will appear. Unless the moderator applies the Crown icon to himself or another participant, video tiles of all participants’ webcams will start to populate the main area as participants join.
- Only for the moderator:
- When the Crown is applied to a participant, that participant alone is shown in the main preview area. As the moderator, you can undo this action by either clicking the “x” icon in the top-right corner of the large participant video area, or by passing the Crown to another participant, including yourself.
- Use the asset slider below the preview area, which contains all assets previously added to the Screening Room Group, to showcase an asset in the main preview area.
- In case a video asset is selected, immediate and concurrent video playback is started. The video is streamed directly and simultaneously to all participants; pausing and skipping along the video timeline will be reflected to participants as well. Participants will not be able to control playback themselves.
- Closing the currently highlighted asset by clicking the top-right “x” icon will return the preview area to the webcam view.
Only the moderator can see the asset slider and select assets for preview and playback. Also, while a video is playing, only the moderator can control its playback. All other participants will only be able to passively view the video and change the audio volume.
A theoretical maximum of 16 participants can be displayed concurrently while each participant has their webcam enabled. However, depending on your computer’s processing power, you may encounter performance issues at around 10 participants or more. In this case, please disable webcam video on additional participants.
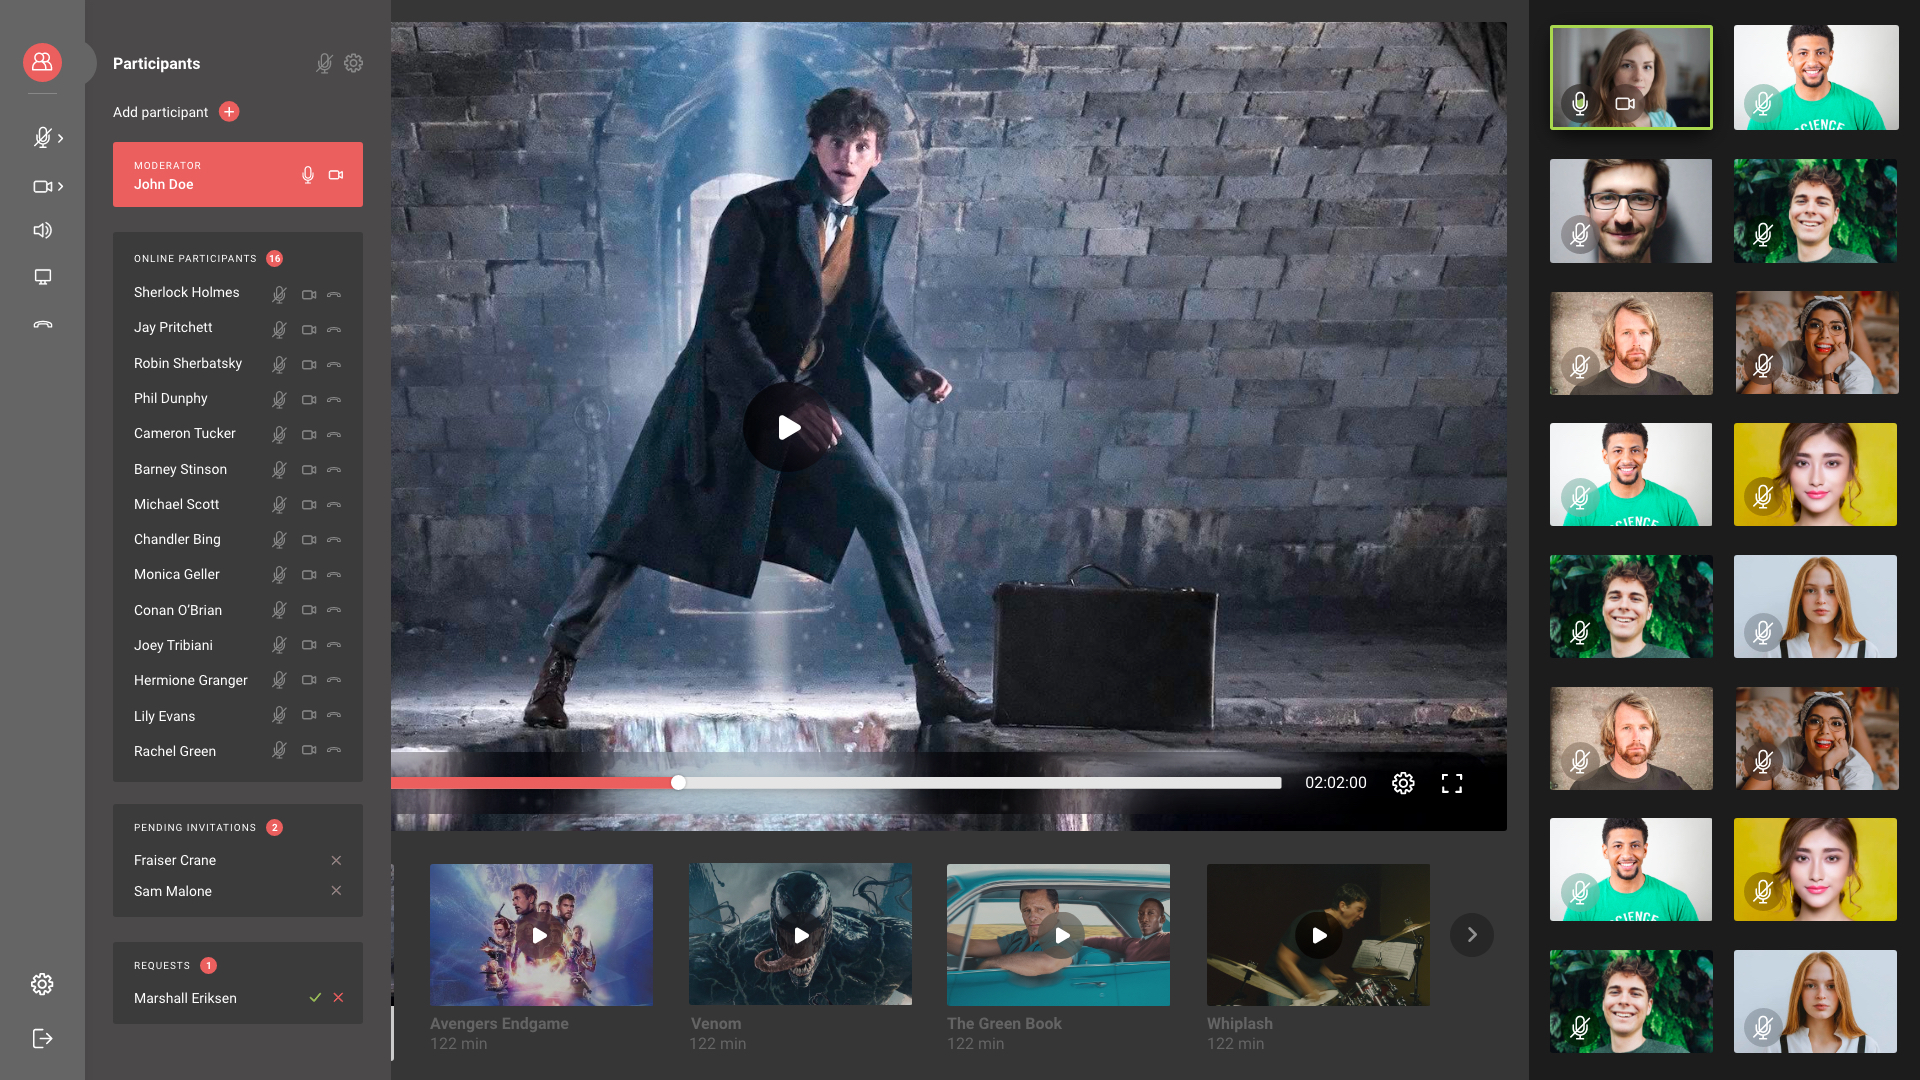
The screening conference view for moderators lets you control technical options, participant settings and media
Allowing participants to review presented videos outside the conference
If you are using MediaStore’s white-label client site design (or a custom design making use of this feature), any users who have explicitly been added to the Screening Room Group (as described above) will be able to find the video contents of the conference in their Screenings section in the logged-in client site. This means that users can optionally be given the opportunity to review presented videos on their own time.
Note that this only works if all of the following conditions are met:
- The access setting of the Screening Room Group itself is at least Viewable.
- The client user has been added to the Screening Room Group explicitly (as described above).
- The presented video(s) which were added to the group have at least Viewable access for the user. This means that the video(s) must have either Viewable access themselves, or Viewable group access must be defined for the video(s) within the Screening Room Group.
Please also read more about non-conference usage of Screening Rooms here.
Troubleshooting
In case you are facing issues while preparing or hosting your screening conference, please refer to our troubleshooting guide.